

Your Amazon catalog deserves better than inaccurate UPC codes.
And we get it, understanding the concept of UPC codes can be overwhelming, especially if you’re new to the Amazon marketplace. In addition, at first glance, UPC codes can seem like a foreign language. In addition, and the process of changing them may seem like a daunting task. This causes many sellers to feel stuck and unsure of what to do next.
There’s also the added pressure of ensuring that your UPC codes are accurate and valid. Amazon requires sellers to provide a valid UPC code for each item they list for sale. Furthermore, and failure to do so can result in account suspension or product delisting.
Want to get up to speed on UPC code changes? We got you! In today’s post, we’ll help demystify UPC codes and walk you through the process of changing them on Amazon’s catalog.
What are UPC Codes anyway?
Universal Product Codes (UPC Codes) are standardized barcodes that are used to identify products. The code consists of 12 digits, with the first 6 digits representing the manufacturer or vendor. Moreover, and the last 6 digits representing the specific product.
If you’re an online retailer, UPC codes are essential for accurately listing and selling your products. Moreover, not only do they ensure that you’re listing the right product, they also help prevent counterfeiting and duplicate listings. Additionally, when you list a product on eCommerce platforms like Amazon, you’ll need to include the correct UPC code.
Using the correct UPC code helps prevent confusion among customers, which can result in returns or negative reviews. UPC codes are critical for managing inventory and tracking sales. As a result, they allow you to quickly and accurately scan products during the order fulfillment process, reducing errors and increasing efficiency.
Why do you need to change your UPC Codes?
Now that you know how critical UPC codes are for the accurate listing and identification of your products. Let’s take look at why you might need to change UPC codes on your Amazon catalog.
There are several reasons for changing a UPC code on Amazon, and they are as follows:
- Incorrect UPC Code: Accidents happen. If it just so happens that you mistakenly listed a product with the wrong UPC code, you need to change it to ensure that the correct product is being listed and to prevent any potential confusion among customers.
- Updating product information: If you need to update the product information on an existing listing, you may need to change the UPC code as well. If you changed the packaging or added new features to the product, you may need to update the UPC code to accurately reflect these changes.
- Changing the product: If you’re discontinuing a product and replacing it with a new one, you’ll need to change the UPC code to reflect the new product. Therefore, this will ensure that the new product is listed correctly and prevent any confusion among customers.
- Duplicate UPC Code: Some Amazon sellers experience issues with a duplicate UPC code. If you ever encounter this problem, you’ll need to change it to ensure that your product is listed correctly and avoid any potential legal issues. Duplicate UPC codes can lead to trademark infringement and other legal problems.
80+ in-house specialists across PPC, supply chain, account management and content.
Here’s How to Change your UPC Codes on Amazon.

Changing UPC codes on Amazon’s catalog requires careful attention to detail and adherence to Amazon’s policies and procedures.
Follow these step-by-step instructions to successfully change UPC codes on Amazon’s catalog:
Step 1: Check if your product qualifies for a product ID change.
Before attempting to change the UPC code, make sure that the product qualifies for a product ID change. Consequently, only products that are identical to the original product and have the same packaging can be updated with a new product ID. However, if there are any changes to the product, a new ASIN will have to be created.
Step 2: Purchase a GS1-sourced UPC or EAN.
Amazon requires all sellers to use GS1-sourced EANs or UPCs to offer their products.
These codes are verified through the GS1 Global Database. And using non-GS1 sourced codes may lead to issues with ownership and product ID assignment.
Step 3: Allow outdated inventory to sell out.
If the product is stocked by Amazon through Vendor Central or is fulfilled by Amazon (FBA). On the other hand, allow inventory labeled with the old product ID to sell out.
If you sell and fulfill your own products (Merchant Fulfillment). Make sure that all inventory labeling is updated to the newly purchased product ID barcode.
Step 4: Contact Amazon Support.

Contact Amazon Support to request a product ID change.
This step varies depending on whether your brand is registered with Amazon Brand Services or not.
If you are registered with Amazon Brand Services…
You can easily contact Brand Services Support through your Brand Services/Brand Registry account. You can follow these steps to start:
- Log into Amazon Brand Services.
- Click “Support”.
- Contact Brand Support.
- Select “Listing Issue”.
- Select “Request a product detail page change”.
- Enter the ASIN and Other Product Information.
- Provide details about the old and new product IDs, and explain that the product was set up with an incorrect product ID assignment and that you would like to correct the assignment.
- Include a link to the manufacturer’s website where the correct product ID is displayed and affiliated with the product.
- Attach the manufacturer’s catalog or take an image of the product from several angles that show the packaging and branding of the product, including a legible depiction of the product ID label on the product.
- Submit the case.
If you are not registered with Amazon Brand Services…
Don’t worry! You can still submit the product ID correction request through standard Seller or Vendor Central support services. You can follow these steps instead:
- Contact Seller Support or Vendor Central Support.
- In the case information, list the old product ID and the new product ID, and explain that the product was set up with an incorrect product ID assignment and that you would like to correct the assignment.
- Include a link to the manufacturer’s website where the correct product ID is displayed and affiliated with the product.
- Attach the manufacturer’s catalog or take an image of the product from several angles that show the packaging and branding of the product, including a legible depiction of the product ID label on the product.
- Submit the case.
Step 5: Wait for Amazon’s decision.

Amazon reserves the right to decide if a new ASIN offer needs to be created or if a preexisting ASIN can have its product ID updated.
Following the steps above does not guarantee that Amazon will update or change the product ID assignment on existing ASINs. Make a compelling case, submit, and be patient!
Here’s How to Perform An Amazon Flat File Partial Update to Change Your UPC.

Amazon has another solution to update specific fields in yout Amazon listings and make product management easier: the Flat File Update feature.
And while updating the UPC catalog involves submitting a request to Amazon to update UPC codes. A Flat File Update allows sellers to update the UPCs themselves. It essentially allows sellers to have more control over the updates they make and enables them to make changes in bulk. Saving valuable time and effort.
Both options serve the same purpose: updating a UPC catalog. On the other hand, the Flat File Partial Update feature provides sellers with more control and flexibility over the updates they make. Updating the UPC catalog, on the other hand, is more efficient for bulk updates but offers less control over the changes made.
If you want to perform an Amazon Flat File Update to change your UPC codes. Here’s a step-by-step process to help you get started.
Step 1: Prepare your Amazon Flat File template.
1.1. Log in to your Amazon Seller Central account.
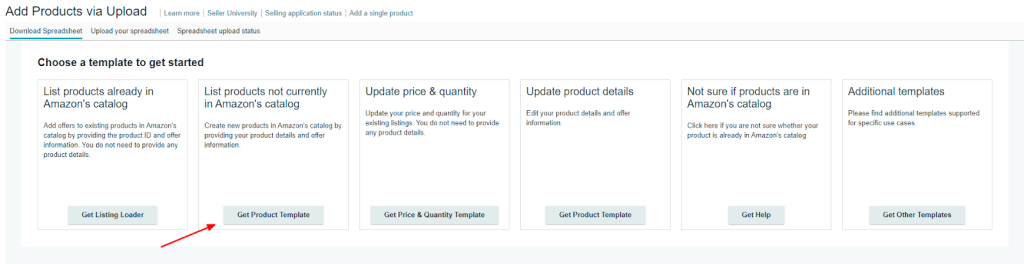
1.2. In contrast, under Catalog on Seller Central, click “Add Products via Upload.”
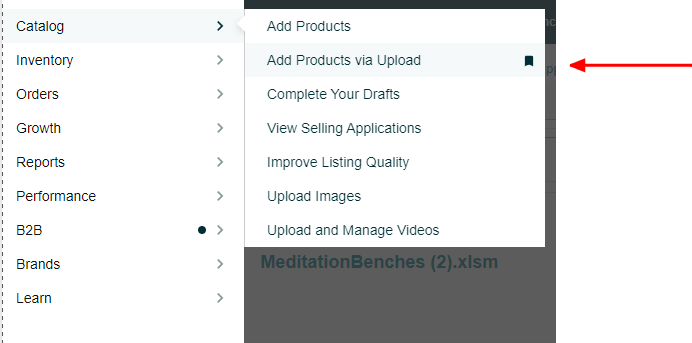
1.3. Thus, under Download Spreadsheet, click Get Product Template on List products not currently in Amazon’s catalog. Then select marketplace that you would like to edit the listing.
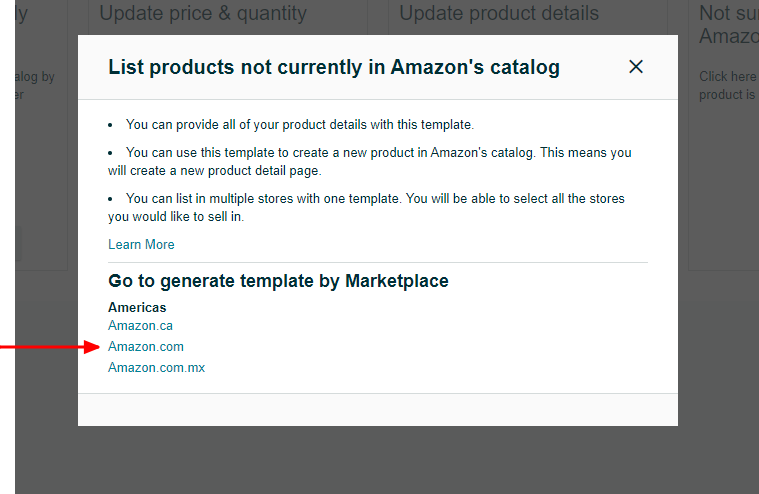
1.4. On the other hand, select the types of products you wish to edit by choosing the corresponding category in the product classifier.
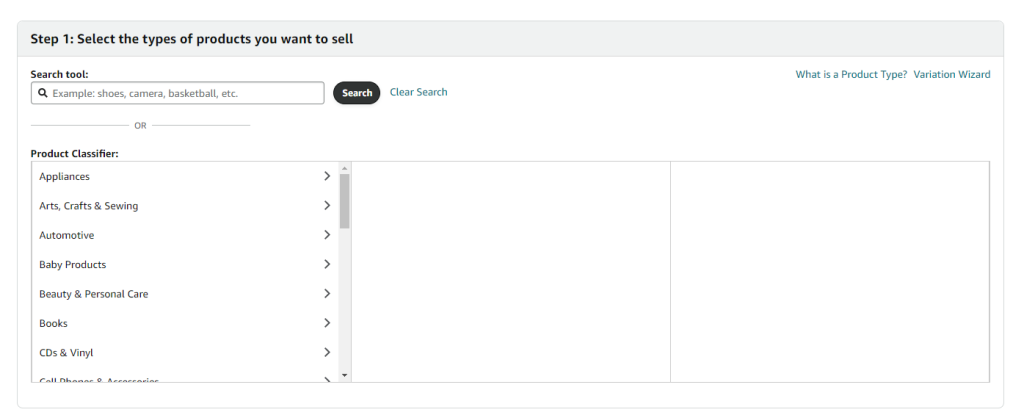
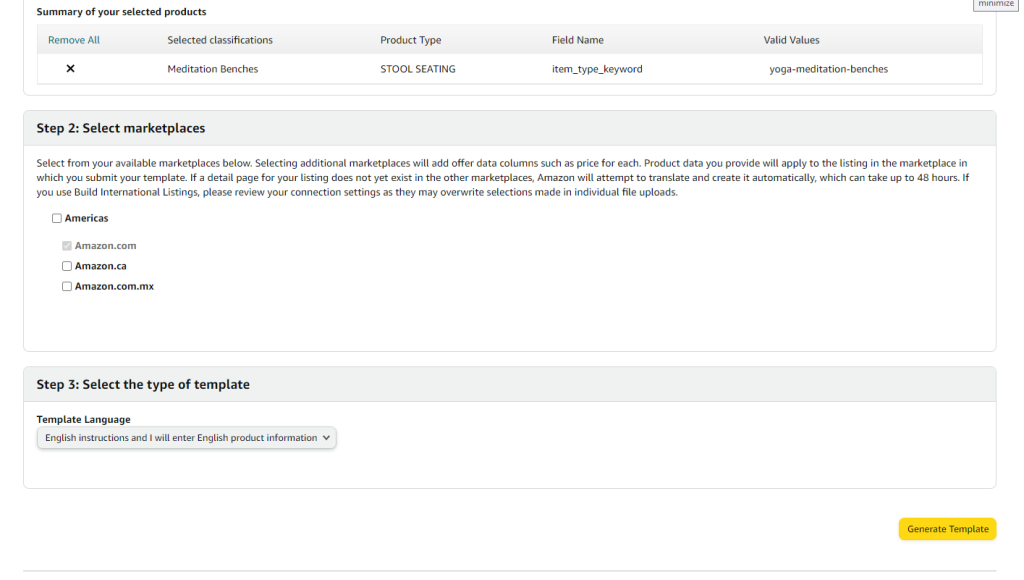
1.5. Click Generate Template to get the feed flat file.
Step 2: Fill in the necessary data for your partial update.
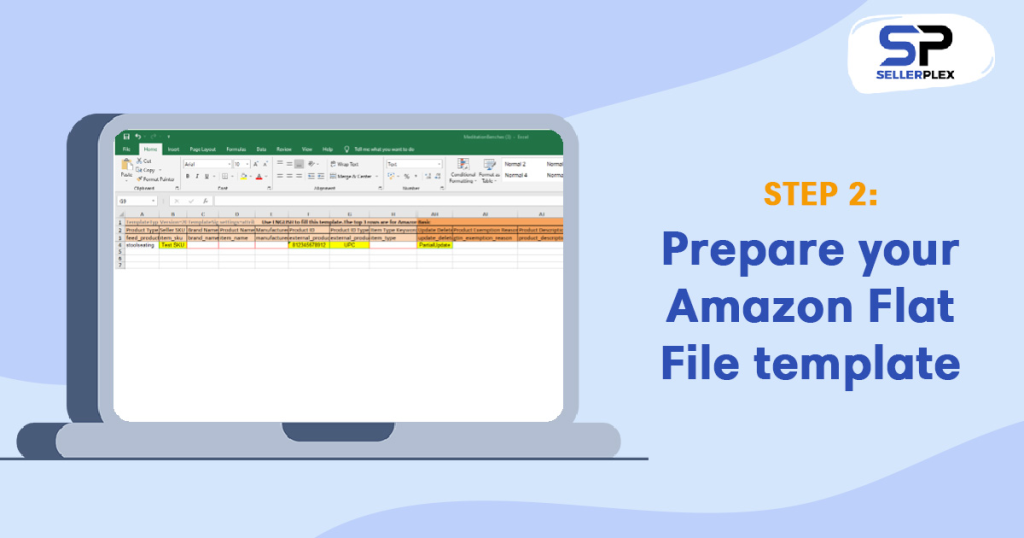
2.1. Open the downloaded template using spreadsheet software, such as Microsoft Excel or Google Sheets.
2.2. For example, locate the “Template” tab and review the “Data Definitions” for information on which columns to update.
2.3. For instance, fill in only the columns you want to update. Required columns are typically “sku,” “product-id (UPC),” “product-id-type,” “item-condition,” and the specific attributes you want to change.
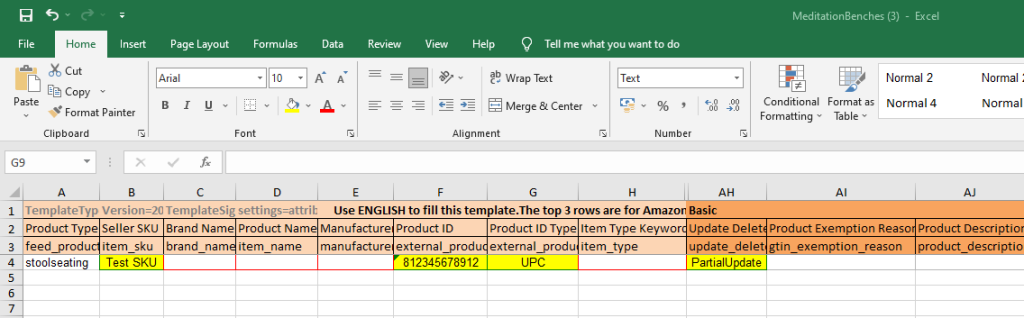
Step 3: Upload your Flat File for a partial update.
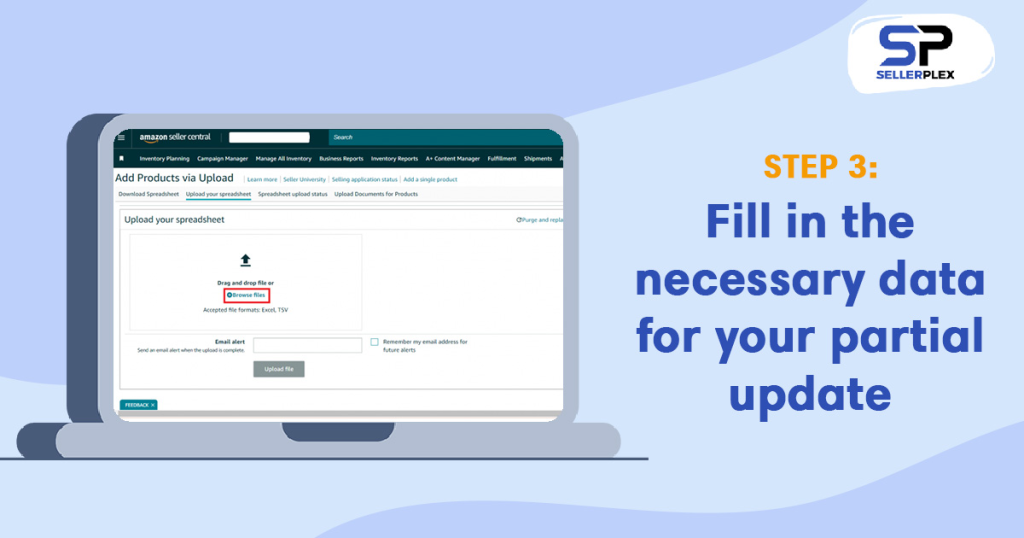
3.1. Go to Upload your Spreadsheet.
3.2. Click “Browse” and locate your flat file.
3.3. Specifically, click “Upload” to submit your file for processing.
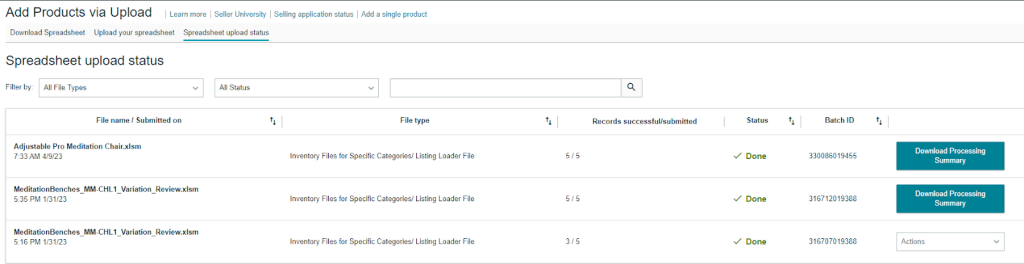
Step 4: Monitor the status of your partial update.
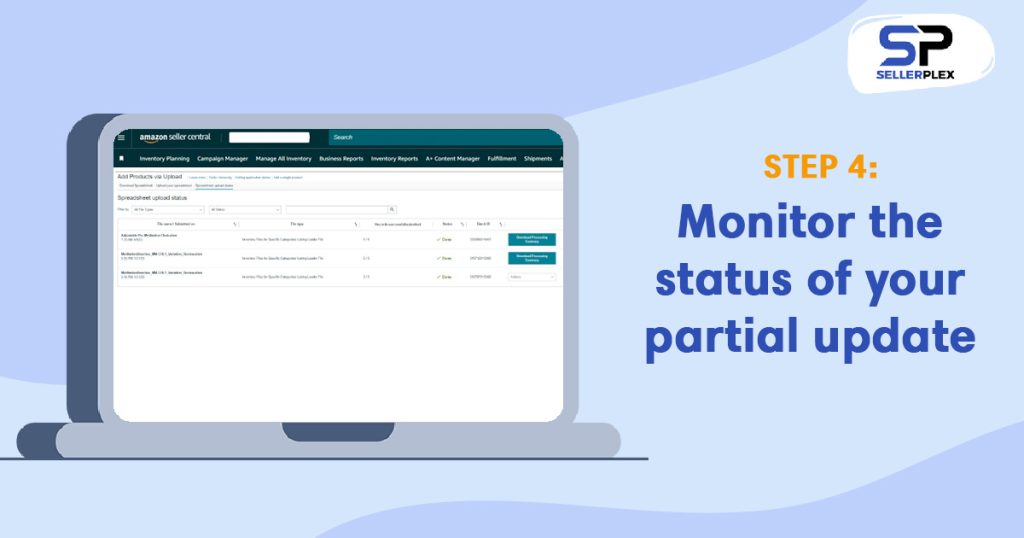
4.1. Go to “Inventory” > “Add Products via Upload” > “Monitor Upload Status.”
4.2. In particular, check the status of your upload. If successful, you will see a “Done” status. Furthermore, if there are any issues, review the error report and fix the problems before re-uploading.
Our Final Thoughts…
Changing UPC codes is a complex process that requires careful attention to detail. While it can be tempting to rush through the process. Taking the time to follow each step carefully and ensure that all necessary information is accurate can ultimately save time and frustration down the line.
Don’t forget to start by verifying your product’s eligibility for a UPC change and ensuring that the new code meets Amazon’s guidelines! Carefully update all relevant information in your seller account and catalog, including images, descriptions, and pricing. Monitor your product closely to ensure that the changes have been applied correctly and that there are no issues with sales or fulfillment.
You can always contact your dedicated Amazon team at SellerPlex! As part of our Amazon agency services, we will help you deal with this and more. Similarly, with patience and attention to detail. We can successfully change UPC codes on Amazon and continue to grow your business on the platform.
Day-to-day Seller Central operations handled for you: catalog health, cases, compliance and buyer messages.
Want more of this in your Google results? Add SellerPlex as a preferred source.